Youtube Live Streaming device using Raspberry Pi
This post shows how to create a Youtube Live Streaming device using Raspberry Pi.
Recently we have bought a fish tank with two goldfish and we were thinking about integrating technology into this context.
Our first project is a Live streaming device using Raspbery Pi that will be able to stream live video from the aquarium.

Youtube Live Streaming Raspberry Pi Fish Tank 1
Prerequisites
In order to do Youtube Live Streaming you will need:
- Youtube account that has live streaming (https://support.google.com/youtube/answer/2474026?hl=en
- Raspberry Pi (version 3 used in this project) https://www.raspberrypi.org/products/raspberry-pi-3-model-b/
- Raspberry Pi Camera (PiCam Noir used in this project) https://www.raspberrypi.org/products/pi-noir-camera/
- In case you have a Raspberry Pi version lower than 3 that does not have a wifi chip – you also need a wifi dongle or use a ethernet cable for networking
- Optional – cardboard box, tape, battery
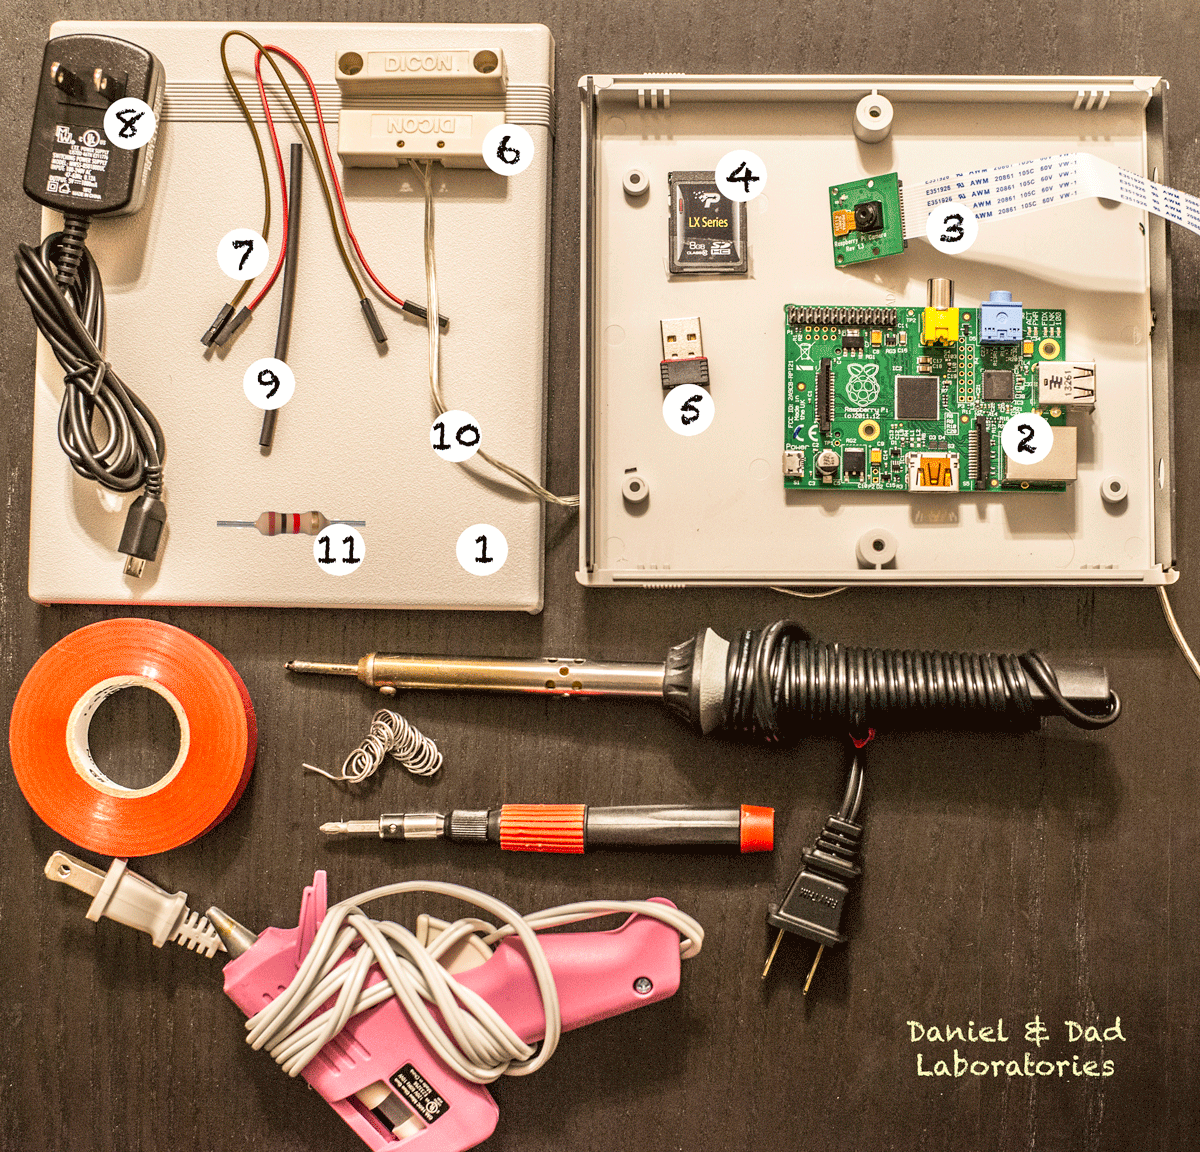
Hardware
As a Raspberry Pi case we have used a cardboard box (the box received with several products shipped by Adafruit)
With a cutter knife created the openings for connectors (usb, power, network, hdmi) and fixed the Raspberry Pi board inside with folded paper).
Connected the Pi Camera, wrapped the connector outside the box and taped the camera on the box.

Youtube Live Streaming device using Raspberry Pi
Software Installation
This part requires more effort and we have spent some time trying to use the default software installed on raspbian linux.
Alternatively you can try this article that describes the use of raspivid tool to stream, in our case, using raspivid did not work and we have tried the ffmpeg tool.
Let’s proceed with the installation:
- If not enabled already, enable the camera using the raspi-config command
- Install the default video tools
sudo apt-get install libav-tools3. Try the camera with the following command and check the file image.jpg on home folder
raspistill –o image.jpg4. Install video tools (ffmpeg) – used this article as reference: https://www.jeffreythompson.org/blog/2014/11/13/installing-ffmpeg-for-raspberry-pi/
-
cd /usr/src
-
git clone git://git.videolan.org/x264
-
cd x264
-
./configure --host=arm-unknown-linux-gnueabi --enable-static --disable-opencl
-
make
-
sudo make install
-
cd /usr/src
git clone https://github.com/FFmpeg/FFmpeg.git
-
cd ffmpeg
-
sudo ./configure --arch=armel --target-os=linux --enable-gpl --enable-libx264 --enable-nonfree
[if receive Error libx264 not found
install:
sudo apt-get install yasm libvpx. libx264.]
-
make
-
sudo make install
If no errors during installation, you can test ffmpeg running the ffmpeg command.
5. Install sox to create loop background sound (optional)
sudo apt install sox
sudo apt-get install libsox-fmt-mp3
6. Create loop audio for background sound (optional)
# download mp3 sample and create loop
# save the file (as example sample.mp3), create loop_sound.mp3 using sox
sox sound.mp3 loop_sound.mp3 repeat 1000
Running
replace the YOUR_KEY tag with your youtube secret key provided by youtube.
raspivid -rot 90 -o - -t 0 -vf -hf -fps 30 -b 6000000 | ffmpeg -i loop_sound.mp3 -re -ar 44100 -ac 2 -acodec pcm_s16le -f s16le -ac 2 -i /dev/zero -f h264 -i - -vcodec copy -acodec aac -ab 128k -g 50 -strict experimental -shortest -f flv rtmp://a.rtmp.youtube.com/live2/YOUR_KEY
In order to run the command in background you can create a shell file with the command above (e.g stream.sh, be sure give run permissions “chmod a+x stream.sh”) and run
nohup ./stream.sh &

Youtube Live Streaming using Raspbery Pi
A full list of commands used in this article can be found on this git repository: https://github.com/smarcu/youtube-live-streaming-raspberry-pi